Burlap Mason Jars and Fall

I love fall! Did you hear that?
I LOVE FALL!!!
The weather becomes a little nicer and sleeping with windows open and a cool breeze whisking in is just about the most refreshing way to rest that I can think of. Especially with all the little night bugs singing their tunes.
Another reason to love fall is the food! The crisp, sweet-tart smell of apples and the smooth rich smell of pumpkin. The apple tree did great this year and I canned applesauce and apple pie filling, along with all sorts of other delightful treats.
Now I’m starting in on pumpkin treats and a recipe is coming soon 🙂
The other reason to love fall is the decor. In the past, I’ve went with traditional fall colors and I really like that. But this fall has been a little different.
We are well into October and haven’t yet had a frost. Without a frost, the leaves don’t change color so the trees are either bare, or green depending on variety and the leaves on the ground are brown.
In addition, my dear mother is painting our futon and the old dresser I remodeled into toy shelves (more on that later this month) white, bringing more of a clean look to our living room. So with that in mind…
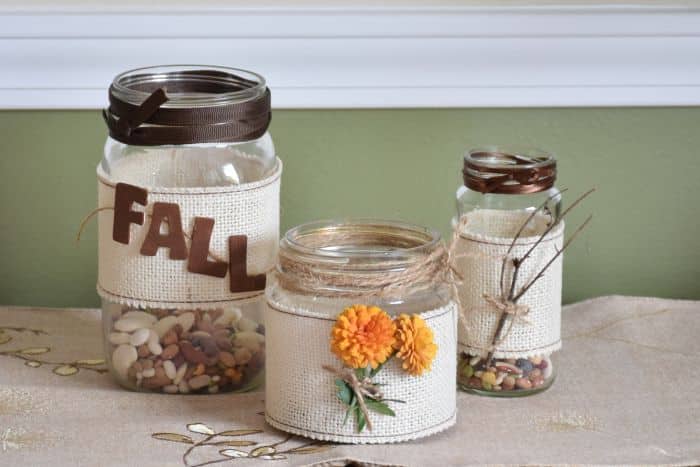
My fall decor this year are in brown and white contrasts.
I started off with burlap mason jars and fall lettering. Once I figured out what I was going to do, the entire project took less than 15 minutes start to finish!
Burlap Mason Jars and Fall
Odd numbers are artsie. I pulled 3 jars of random sizes from my shelves to work with. Doing this with 5 jars would also be cute, but may look overwhelming depending on the space you are placing them in.

You will need:
- Jars
- Burlap ribbon
- Twine
- Wooden letters
- Other decor items like twigs, or flowers
- Brown ribbons
- Scissors
- Hot glue
- Filler and tea lights (optional)
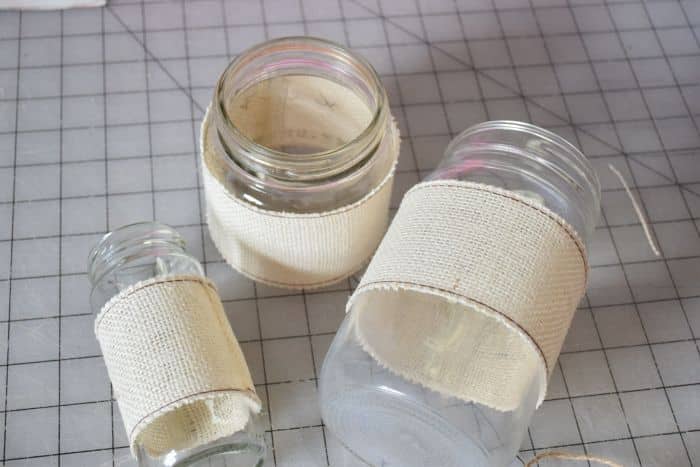
I have a love/hate relationship with using mason jars for decor. After all, I also use them for canning and some years I nearly run out of jars. I’m done canning for the year though, so I knew I could use a few.
However, I have no intentions of doing something to the jar that would render it useless for canning. Spray adhesive would’ve worked the best for adhering the burlap to my jars. However, hot glue is easily removed from glass and my top pick.

I squeezed a line of glue out, the width of my ribbon and pressed one end against it. Next I wrapped the ribbon around the jar, squeezed out another line on the loose end of the ribbon and adhered it to itself.
When I need the jars again, the burlap ribbon will likely be ruined, but the jars will have minimal glue that comes right off.
Next was the fun part (in my opinion that is), adding the embellishments.
Dried, or paper flowers would’ve worked best, but the only flowers I am good at making are fabric ones like these, and I didn’t have the right fabric for this project. If you use fresh flowers like I did, be sure to put dots of glue behind the heads as well. Otherwise the heads will droop as they dry.

The ribbon was easy, just wrap it around the rims until you achieve the look you desire, then make a little bow.
I used 3 different kinds, just to add more character.

At this point you could place dried flowers such as hydrangea inside or some filler and tea lights. I thought black beans would be nice and contrasty, but when I went to get them I found a bean mix and liked it even better!

The mixes of browns with the cream burlap is pleasing and the orange mums give it a nice little color pop. For a few days that is. 🙂 By the end of the week, they will also be a shade of brown.
I loved how easy this project was and hope you enjoyed it as much as I do!
What would you do with burlap mason jars and fall?